The Import Instruments tool is template based, generated specifically for each instrument. It allows users to import instruments through a CSV file. Instrument imports only allow for basic question properties to be uploaded. Some questions may need to be edited after import. Prior to importing an instrument, you must first download the import template. To do so, click Import Instruments from the Admin menu and then click Generate Template. This tool is only available to site admins. Other users can request the template from the COINS team.

The key to successfully importing instruments from the template is correctly filling out the import template. The exported template from COINS will give you an example as a guide. Carefully complete the template and when done, save the template as a CSV, as this is the only format that is accepted upon upload. If using a Mac version of Excel to create your CSV, it may need to be saved as a Windows CSV rather than a regular CSV.

Complete the following information about the instrument only once in row 2 (see the Create Instrument page for more information on each field below):
- Instrument Label (required) – Title of the instrument
- Instrument Description – Optional description of the instrument that is not visible during Self Assessment or Data Entry
- Instrument Version (required) – The version of your instrument
- Display Type (required) – Specify if your instrument is a traditionally/regularly formatted instrument (full) or a calendar. Use the number 1 to specify a full instrument. Almost all instruments will use the Display Type of 1.
- Max Instances/Visit (required) – Specify how many times the instrument should be administered per visit

Complete the following for each section you wish to create. You must have at least one section to add questions and it should also be on row 2:
- Section Label (required) – Title of the label you must provide in row 2
- Section SA Label – Optional title of the label you want displayed in Self Assessment
- Section Description – Optional description of the label
- Section SA Description – Optional description of the label you want displayed in Self Assessment (can be used for directions, etc.)
- Questions Per Page (required) – Numeric value for how many questions you want displayed per page in Self Assessment

To add additional sections, you will need to complete the same information from the previous slide for each additional section. Section information only needs to be listed once per section. Placement of the section information is very important. You should add the section information for each additional section on the same row as the first row of the first question you want in the section.
In the example above there are two sections labeled I and II (outlined for visualization). Section I has two questions that will be displayed 1 question per page and has a description. Section II has three questions that will be displayed three questions at a time per page and does not have any descriptions. Both sections are correctly filled out.

Complete the following for each question you wish to create which should also start on row 2:
- Question Label (required) – The actual question (not the question ID)
- Self-Assessment Label – The question as you want it displayed in Self Assessment. If this is left blank, the Question Label will be shown in SA as a default.
- Question Description – Optional description of the question (not visible in Self Assessment, only in Data Entry)
- Display Response Label First (Y or N, required) – Choose whether you want the stored numeric value or the Response label to be shown first for Data Entry
- Max Instance (required) – Numeric value for maximum times this question should be asked. This will almost always be 1.
- Response Label (required) – The text associated with a response option
- Response Description – Optional response description (not visible in SA or Data Entry)
- Response Value (required) – The stored numeric value associated with a response (must be numeric)
You can add two different types of questions using the import tool – free text fields and canned responses. Other question types (e.g. calculated fields) will need to be added after import OR uploaded as text or canned and then edited. Columns K – O should only be added once in the first row for the question.
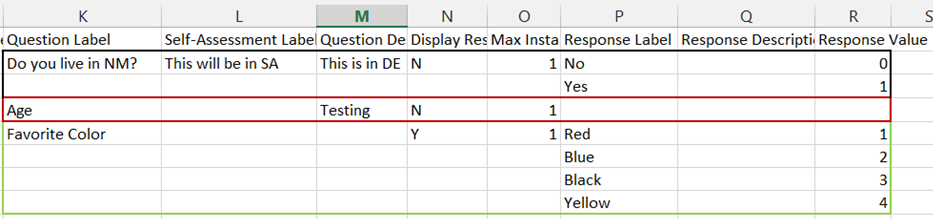
In the example above there are three questions in this instrument (outlined for visualization). The first and last question will be canned responses. Age will be a free text field. Text fields are created when Response Label, Description and Value are left blank. Canned response are created when there is a Response Label and Value. Note: The response options DK (Don't Know) and MD (Missing Data) will be added automatically to canned response questions. You will want to not import those as response options or you will have them listed twice.
For canned responses, the labels should be listed one after another in columns P - R. The next question should start in the next row following the last response label row of the previous question.
To import the template, return to Import Instruments from the Admin menu, if you are not a site admin, return the template to the COINS team for importing. Select a unique, valid Question Prefix that will be assigned to each question and number sequentially starting from 001. If you enter a question ID that is already in the database you will see a X next to it that indicates that you cannot use that question ID and will need to choose a new one. If you see a ✔, that ID is not already in use and can be used for your import. Click Browse for File and select the file to import. If the import is successful the Instrument ID will be displayed. If the import was not successful, you will be prompted with a message stating why the import was not successful. After a successful import, click View to open the newly imported instrument or click Add another to import another instrument
Comments