Query data to choose participants to contact
Go to Query Builder from the Home menu
Check the box next to Subjects are enrolled in a study
Select “(MRN) JROBERTS [20-844] ------ MRNRECRUIT” in the study drop down

 Check the box next to Demographics
Select “(MRN) JROBERTS [20-844] ------ MRNRECRUIT” in the study drop down
Select the desired field(s)
Click Add to List
Click Preview
The number of records that meet your search criteria will appear
Recommended export options
 Field Separator: Select Comma
Text qualifier: default
Line terminator: default
Other options: choose desired options
Include subject tags: default
Click Export
 Check the box next to Assessments
Select “(MRN) JROBERTS [20-844] ------ MRNRECRUIT” in the study drop down
Leave Only Double Entry Complete Records (Cs) checked
Select the desired instrument(s)
Leave All Visits
Select desired question(s)
Click Add to List
Click and drag questions to put them in the desired order
Click Preview
The number of records that meet your search criteria will appear
Click Export

Recommended export options
 Click Use Legacy Export at the bottom of the page
 Field Separator: Select Comma
Text qualifier: default
Line terminator: default
Other Options: Check box next to Export only URSIs with data

Include subject tags: default
Assessment Options: default
Assessment Date: select Age of Subject
Data Orientation: Select Cross Collapse by URSI
Select how question IDs are printed: Deselect Include visit ID and Include visit instance
Click Export
--------------------------------------
Subject Trackers
Once URSIs that are potentially eligible for screening are selected, you can use the MRNRECRUIT subject tracker to contact the participants.
 Go to List Studies from the Studies menu in MICIS
Search for MRNRECRUIT
Click the study link

Click “Subject Trackers” at the top of the Study Details page
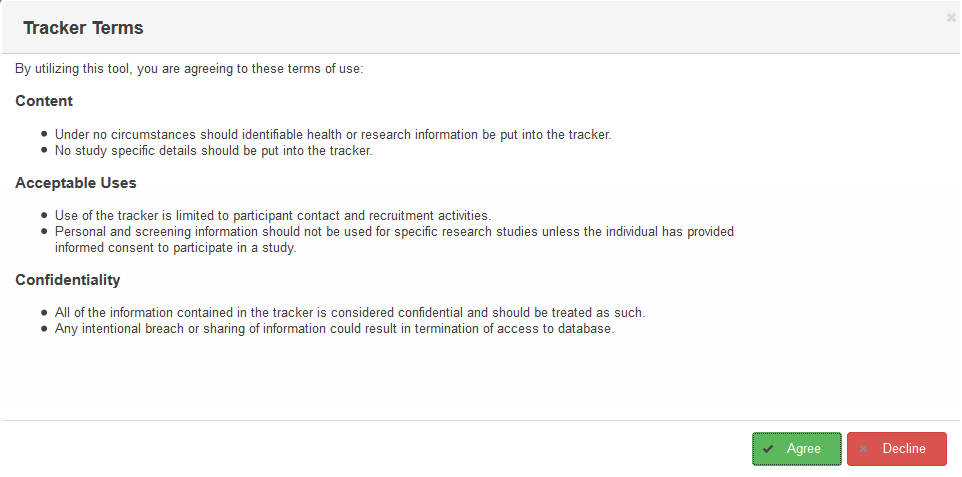
Read the Terms of Use
Click “Agree” at the bottom of the page
Note: you will only have to agree to the terms the first time you try to access the subject trackers.
Using the Tracker
Note: when switched, Personal Details view rows DO NOT match the URSI view rows.
Find a subject you wish to update. The table can be searched and sorted from the URSI or Personal Information view. If you have trackers created, they will also appear on the Subject Tracker table and the responses for them can be searched and sorted as well. Click on the Subject/row you want to add information for to open the trackers available to them.
Click Reveal Personal Details to see the subject's personal information. Alternatively, if you are already searching by Personal Details, you can choose to see URSI and Subject Type information. Click Hide Personal Details or Hide URSI and Subject Type to go back to the tracker table.
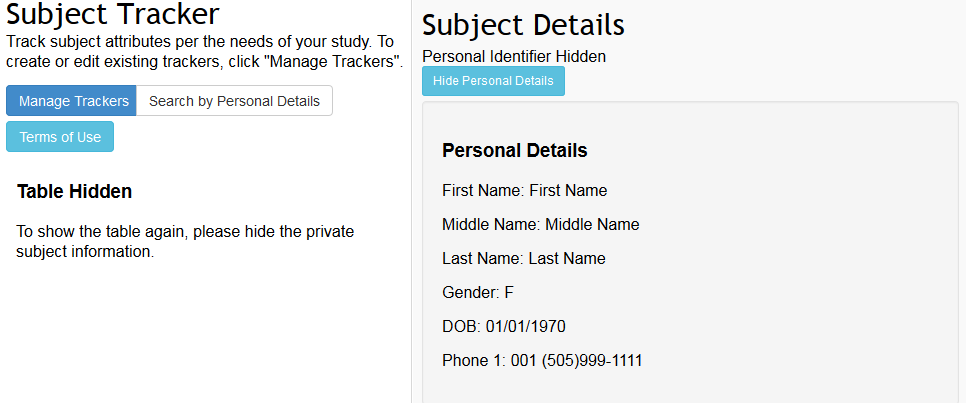
Now you can update the subject's tracker information by adding the date for the event (defaulted to current date) and any necessary Log notes. If you have added Canned Responses for the Log, you can choose one from the drop down list and click + to add it to the Log text field. Click the tracker you want to update, Phone Screen Log in the example image below, and then choose a Response Option from the Standard Response list. If this tracker has custom responses enabled, you can enter any desired text in the Custom Response field.
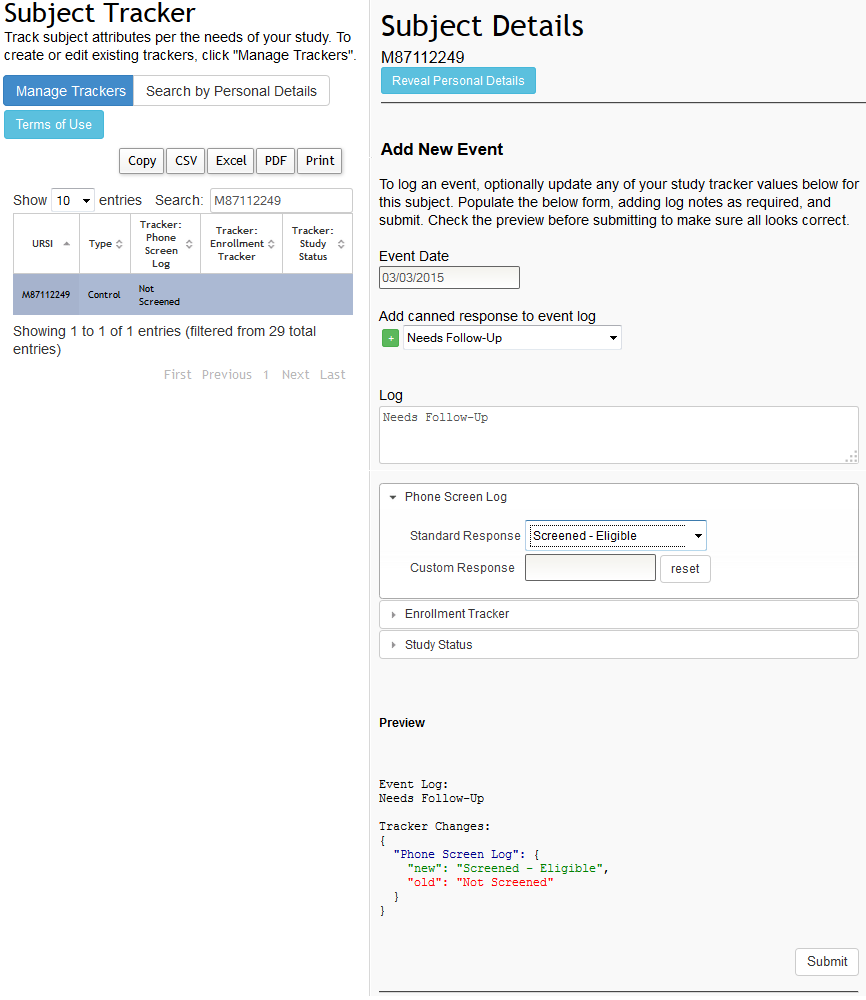
Below the trackers for the study, you will see a Preview of your changes that will be recorded in the Event Log for the subject. In the example above, we can see the new Log status is "Needs Follow-Up" and the tracker is being changed from "Not Screened" to "Screened - Eligible". Click Submit to add your changes. The changes made will now be reflected in the subject's Event Log.
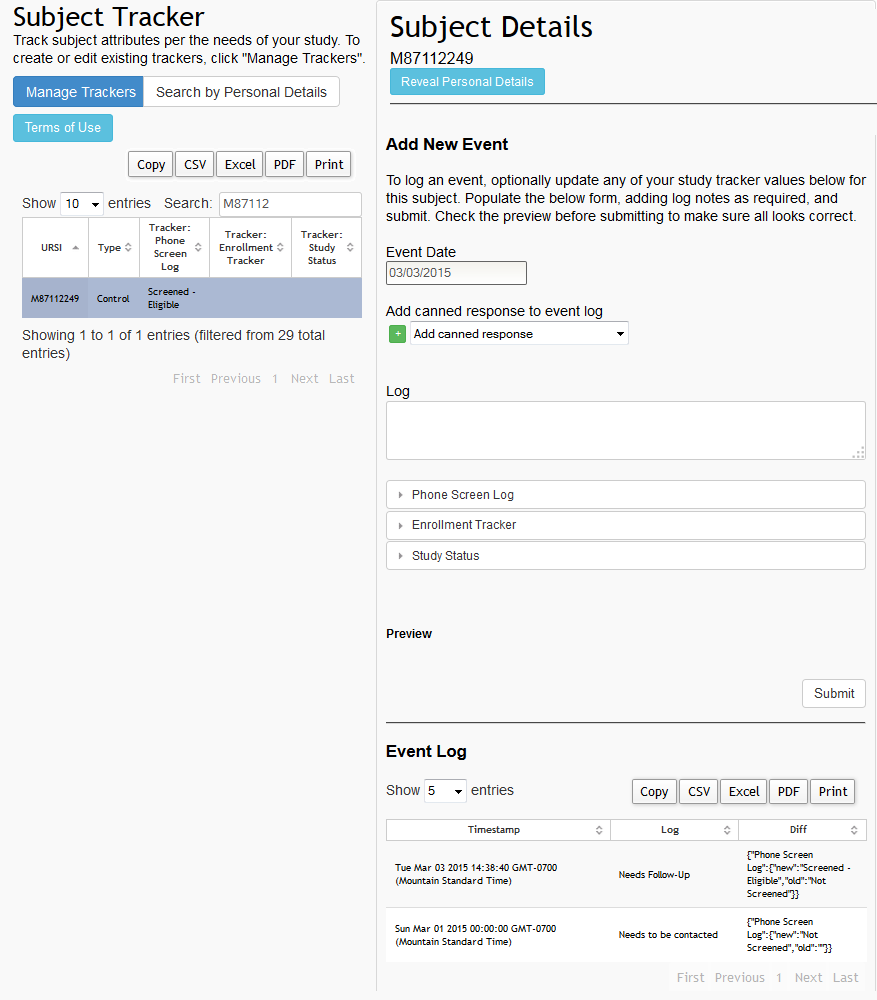
The Event Log will record all information changed for a subject. This provides study staff a full picture of the subject's progress and detailed logging of events.
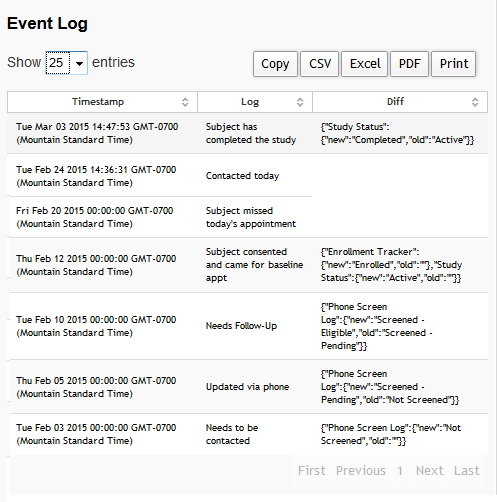
Log
Use for general notes (i.e., “Prefers to be contacted after 5 pm”, “Ok to leave message”, etc.)
Do not enter any study specific information (i.e., “this person has schizophrenia”) or your name or initials.
Considerations after participant enrollment:
Trackers
Currently enrolled until (date): if a subject is enrolled in your study please enter their anticipated participation end date. Please update this with current information.
Reliability: select Recommended or Not recommended from the drop down. Not recommended should be used if the participant is difficult or unreliable.
For new subjects that say yes to be contacted for future studies
- Provide link to participant and they can complete self enrollment and assessments at MRN/data collection site. https://coins.mrn.org/p2/?stype=18401
- If study staff are asked to help/complete self enrollment/assessments, they can use https://coins.mrn.org/p2/?stype=18421.
- Alternatively, study staff can enroll the participant via MICIS and manually load the the assessment queue.
Comments