COINS offers two different ways to queue up Self Assessments for participants. There is Auto Queuing and the original Manual Queuing. The Manage Subject Queues option in the Self-Assess tab is for Manual Queuing and is what will be covered in the article. You can go here for more information on Auto Queuing.
To set up a Self-Assessment queue for a participant, go to Manage Subject Queues under the Self-Assess menu.

In the Participant field, type the URSI or Subject Tag associated with the participant you want to set up questions for. The URSI or Subject Tag will be suggested as you type.

The selected participant's URSI and any associated tags will be listed to the right with the tag value, type and context (g - Global, si - Site, st - Study)

In the Source drop down menu choose the participant’s Source Type.
If the participant does not have a login for the source type chosen, you will need to create one. When creating a new login, as you begin to type in the field, a save button will appear.
In the Login field, create a login to continue creating a queue.
- Logins are case sensitive and must be unique. Do not include any identifiable information or PHI in the login. This data is not encrypted in the database and is displayed on the Event Calendar.
- Acceptable login characters include alpha, numeric and symbols. You can type the desired login into the text box and click Save. If you do not click Save prior to completing the remaining fields, the login will default back to a blank field indicating the login was not saved.
- This login will remain the same across all Visits but can differ by Source Types.
- Logins can be changed by editing the login field and clicking Save.
If the subject already has a login for the chosen source type, it will automatically populate in the field. Choose the correct options for this queue from the drop down lists.
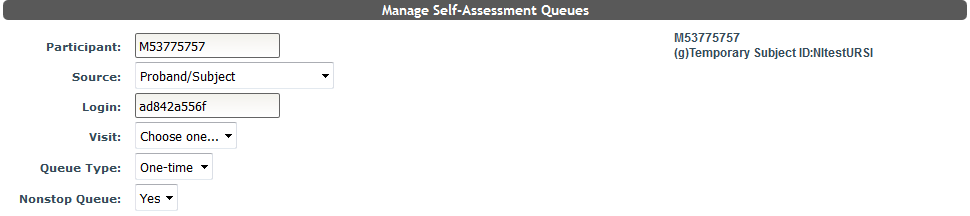
In the Visit drop down menu choose the visit the parent is attending. Study visits can be managed in MICIS. Click here to learn more.
Choose your queue type from the drop down box.
- One-time: this will administer all the Instruments in the queue one time
- Recurring: this will start the Instruments over as a new instance every time the Recurring Queue is opened. Instruments in the queue must have an Instance larger than 1 to work. Instrument Instances can be changed in the Instrument Properties.
- On-going: this type keeps the Instrument in a Pending Status and editable until it has been completed. This typically works best with calendar assessments that are used continuously.
Choose if the queue will be non-stop by selecting yes or no from the drop down box. Non-stop queues mean the page between assessments telling the participant how many questionnaires are left will not be displayed. Default options for non-stop queue types can managed through the study details page in MICIS.

Once the visit is chosen, you will be taken to the queue set up page. If there are items already in the participants queue, they will be displayed.

Participant Queue box - Displays what is in the Self-Assessment Queue for the selected Subject, Source, Visit and Queue Type.
Templates box - Shows any templates that have been created for this Study.
Instruments box - Lists all Instruments that have been created for this study. From this page you can also edit all of the fields that were just completed by changing the drop down boxes at the top of the screen. You can also navigate through Visits and Queue Types by changing the boxes.
To set up a Self-Assessment Queue templates instruments from the boxes on the right into the Participant Queue on the left. To save the Participant Queue you have created click Save Queue. You can also click the X to the right of items in the queue to remove any instruments from the Participant Queue. It is important to remember that all Instruments saved in the queue will be administered in this order.
If a participant does not finish their assessment remaining questionnaires will be visible in the queue. To send an unfinished assessment from the parent's Self-Assessment to the Review Queue, click ->. Unfinished assessments can also be sent to the review queue through the Search Assessments tool.
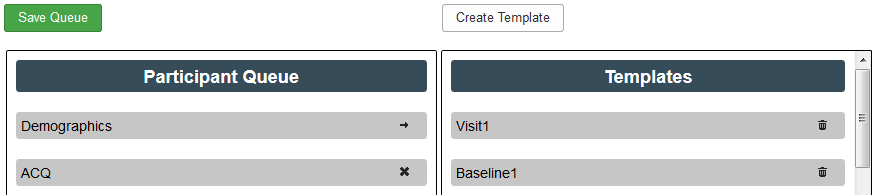
Typically Study Visits have the same instruments administered for each visit. This is when Templates become very useful by helping to save time when setting up queues.
Drag all wanted instruments from the Study Instrument box to the Participant Queue and order as desired. When you are done, click Create Template above Templates. Name the template and then click Submit to save.
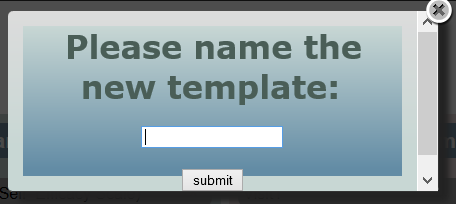
The template will now be visible in the Template box. When the template is dragged over into the Participant Queue, all the Instruments will populate in order. You can also delete Templates by clicking the trash can to the right of the template.
Comments